
There’s nothing more frustrating than watching your horse toss his meal out of the feeder onto the ground. Not only does that behavior lead to waste from trampling and wind, it also increases your horse’s risk of sand colic. Follow these easy, step-by-step instructions to build a horse hay feeder that reduces waste.
What Makes a Good Horse Hay Feeder?
Over decades of horse ownership, I’ve searched for a solution that:
- Allows for quick and easy feeding through a panel fence. This rules out hay nets (major hassle) and the PortaGrazer (great slow-feeder product, but expensive and still kind of a pain).
- Allows the horses eat at ground level to support normal tooth wear patterns, unlike raised feeders.
- Is safe even for busy, curious horses.
- Is reasonably priced and robust, but made of plastic instead of metal that would wear down horses’ teeth.
- Actually keeps most of the hay in the feeder rather than on the ground.
I Built My Own Horse Hay Feeders, and You Can Too
Having struck out on commercial options, I came up with a way of modifying a bunk feeder from my local farm store to meet the above criteria. I made three of them in 2021. Since then, they have been tested by many different equine personalities ~ and approved by me.
Take a look at the final product, then I’ll show you how to make your own.
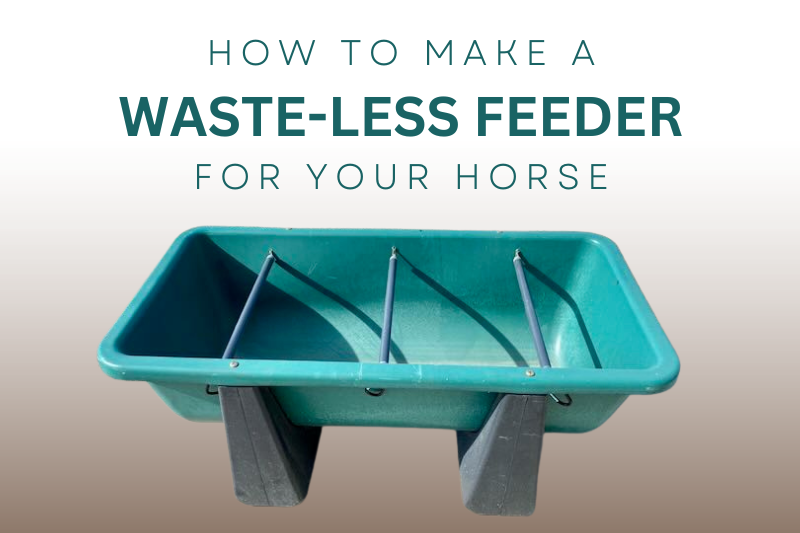
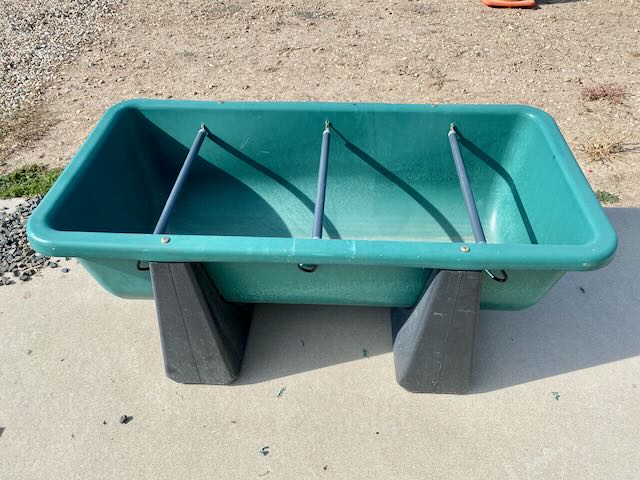
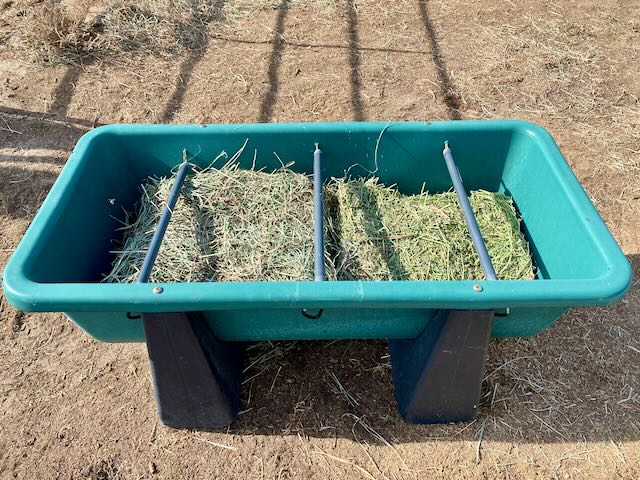
The finished feeder has plenty of room for a large meal. Four flakes fit easily, and I’ve stuffed six or more in at times. I usually put alfalfa on one side and grass hay on the the other, which makes the horses less likely to try to toss the grass hay out in search of those delicious alfalfa bits.
The crossbars leave room to eat but keep flakes contained. If you have a really determined horse, you could modify this design to have four crossbars. The only downside would be increased difficulty when putting hay in the feeder.
Supplies List for Building Your Horse Hay Feeder
To make your feeder, you’ll need:
- One 43-gallon bunk feeder by High Country Supply.
- Three, 1/2 inch diameter, 18-inch long PVC male thread sprinkler risers
- Six keychain-style carabiners
- Paracord cut into three, 58-inch lengths with ends melted to prevent fraying
- Two, 2-foot long x 1 inch wide cam straps
- Drill with 5/16 bit
- Tape measure

How to Build Your Homemade Horse Hay Feeder to Reduce Waste
This is really easy, I promise. It took me about 30 minutes, including finding the right drill bit and pausing to snap photos.
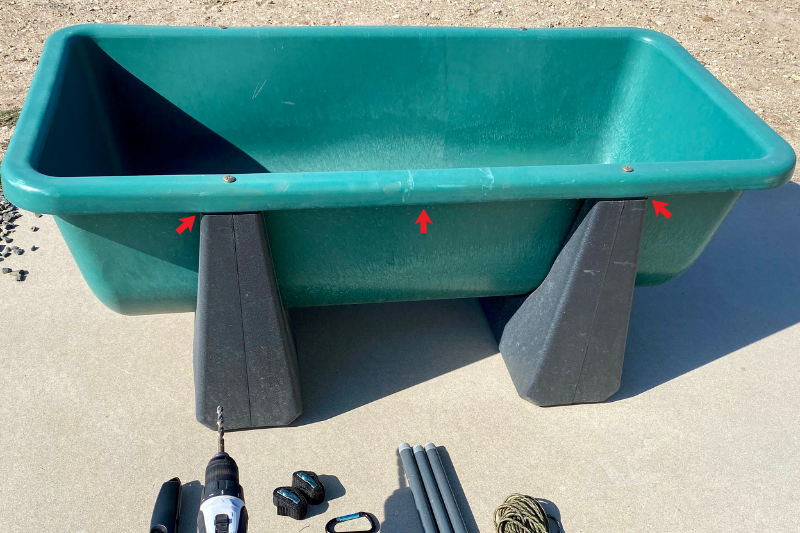
STEP 1: Drill holes in your bunk feeder. Fun, right? It’s easiest if you tip the feeder on its side. Use a 5/16 drill bit.
The red arrows in the photo below show where the holes need to go. Hint: The mid-point between the legs is at the 9.75 inch mark
You’ll put three holes on each side of the feeder, just below the lip. I find that this spacing works really well. It’s easy for me to slip flakes of hay between the crossbars, but hard for the horse to throw them back out.
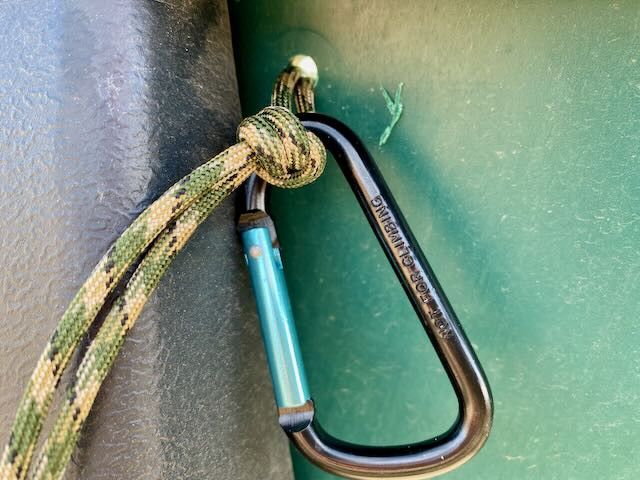
STEP 2: Thread both ends of one of your sections of paracord through one of the holes. Leave enough of a loop to clip on a carabiner.
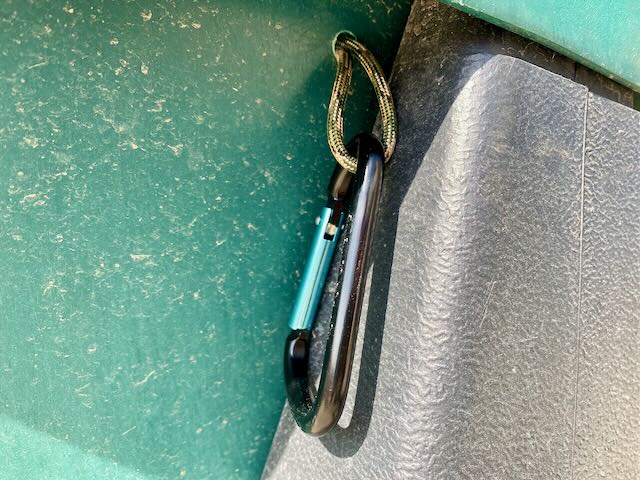
The purpose of the carabiner is to keep the paracord from slipping through the hole. You could use something cheaper, like a large washer, but I like the carabiner because it doesn’t have any sharp edges to wear on the cord, and it’s easy to unclip if I ever need to remove the crossbar in a hurry.
STEP 3: Thread one of your sprinkler risers onto the paracord.
The purpose of the PVC riser is to keep the horse from getting tangled in something more flexible (like chain or uncovered paracord). It’s also not particularly interesting for most horses to chew on, and it’s smooth against their faces as they root around inside the feeder.
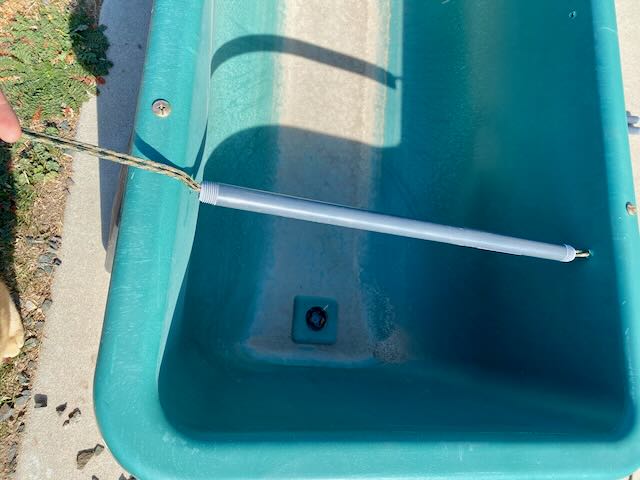
STEP 4: Thread both ends of the paracord through the hole opposite the one you started with. You should have a few extra inches on the other side, which will make it easy to tie a simple knot to close the loop. Be sure you pull the cord pretty taut before tying your knot. Mine ended up with just enough slack to expose about an inch of paracord on each end of the PVC riser.
Clip on another carabiner to keep the knot from trying to slip back through the hole over time.
REPEAT STEPS 1-4 to add the remaining two crossbars. Ta-da!
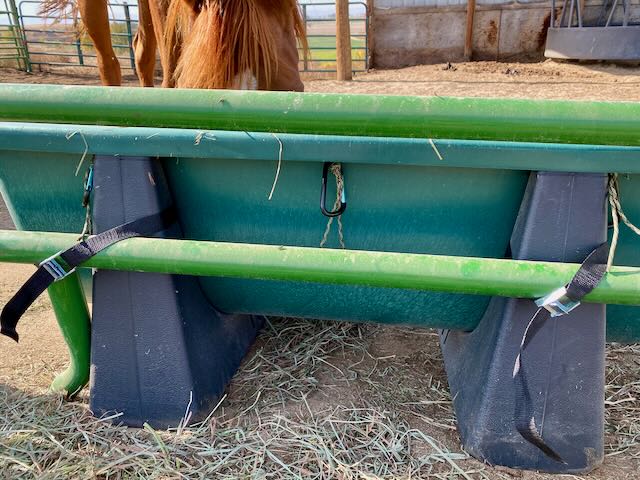
STEP 5: Use the cam straps to secure your new feeder to the fence. This way, it’s easy to detach the feeder for cleaning, but your horse can’t push it all around his paddock.
That’s it! For about $150, I have a bunk feeder that is the best combination of easy use and effectiveness that I’ve managed to find yet.
How well does it work?
That depends on the horse. I’d say it keeps 90-100% of the hay off the ground for most of my horses most of the time. My determined hay-tosser occasionally gets up to half of his hay out of it, but usually much less. I call that a win.
How does it hold up over time?
I’ve been using my feeders for almost three years now. I just ordered new PVC risers, as some of the original ones are starting to split on the ends. Thanks to the handy-dandy carabiners, replacing them will be quick and easy.
If you decide to give this a try, let me know how your horse likes it!
Hey, rider! Would friends and first responders know how to help if you were injured around the stable or on the trail? My free I.C.E. Pack includes printable placards for barn and trailer, cards for rider and horse, and instructions for friends and family. Get yours now.

This page may include affiliate links, and I may earn a small commission (at no extra cost to you) when you purchase through these links. I only recommend products and services I think are helpful and useful. Thanks for helping me offset the cost of maintaining this blog as a free resource!
Oh, this is brilliant! So much easier than nets or slow feeders, and way more friendly on their tooth enamel than the meal grates of some slow feeders.
Ohhh, yes! I forgot to list that (no metal grates) with my criteria, but it’s definitely an issue I ran into a lot when I was looking for a commercial solution.
Thanks for this! Built 2, and they work great.
Does this feeder slow them down at all? Like you I also looked at Portagrazer but seemed like alot of effort to fill daily
Hi Laura! These feeders won’t slow them down. I’ve considered expanding the concept to basically stretch a hay net across the top and attach it around the sides, but then we’re back to the problem of it being a pain to fill with hay. Hmm.
Thank you so much for this great idea! It was so easy to do, and so much more effective than I expected. Brilliant!!!!
Hooray! I’m glad it worked for you! I’m still loving mine every time I feed. 🙂